by Kathy Douglas | Aug 27, 2024 | Desserts
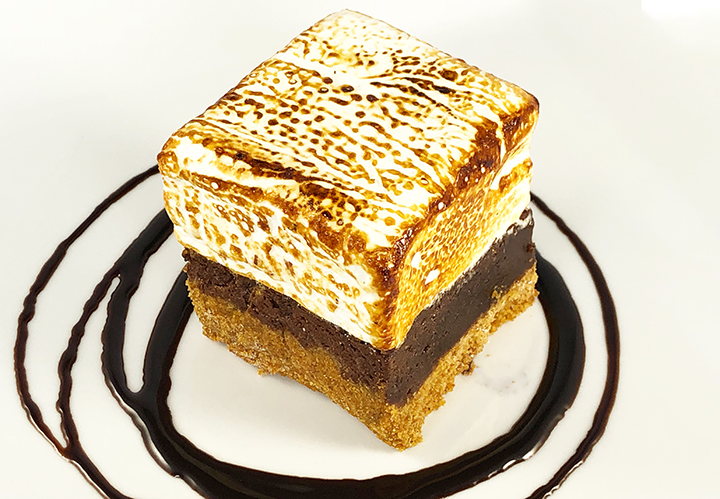
It’s sweet campfire memories with no fire or sticks needed. Experience the nostalgic joy of campfire treats with a modern twist in these irresistible S’more Bar Cookies. Each bite captures the essence of the classic s’more: a buttery graham cracker crust forms the foundation, followed by a rich, chocolatey center that melts in your mouth.
The pièce de résistance is a fluffy layer of homemade marshmallow that can be lightly toasted to perfection. These decadent bars are perfect for satisfying your sweet tooth and bringing a touch of campfire magic to your Labor Day Holiday weekend without needing an open flame. Yield is one 9×9 pan, about 16.
Graham Cracker Crust
¾ cup melted unsalted butter, plus 1 tablespoon for the pan
4 cups graham cracker crumbs
¼ cup sugar
½ tsp salt
Preheat oven to 350˚F.
Line a 9×9” pan with foil allowing extra foil to hang over the sides for easy removal. Butter the foil.
In a large bowl, Stir together the melted butter, graham cracker crumbs, sugar, and salt until well combined. Press into the bottom of the pan and bake for 8 minutes. Remove and cool slightly while you make the chocolate center. Reduce the oven temperature to 300˚F.
Chocolate Center
¾ cup unsalted butter
6 oz semisweet chocolate chips
2 large eggs
2 large egg yolks
¾ cups dark brown sugar, packed
½ cup confectioners’ sugar
1 ½ tbsp granulated sugar
1 ½ tbsp light corn syrup
1 ½ tbsp pure vanilla extract
¼ tsp salt
¾ cup all-purpose flour
Place the butter and semi-sweet chocolate in a stainless-steel bowl. In a large saucepan, bring water to a simmer. Place the bowl of chocolate and butter over the hot water, being careful not to let the bowl touch the water. Stir every few minutes until melted; remove and set aside to cool slightly.
Whisk the eggs, egg yolks, brown sugar, confectioners’ sugar, granulated sugar, corn syrup, vanilla, and salt in a large bowl. Slowly add the chocolate to the egg mixture in small amounts to temper the chocolate into the eggs. When thoroughly mixed, whisk in the flour. Pour the batter over the graham cracker crust and smooth the top. Place in the oven and bake for 1 hour or when small bits still stick to a cake tester when you check for doneness. Remove and cool completely.
Marshmallow Topping
4 envelopes unflavored gelatin
3 cups granulated sugar
1 ¼ cups light corn syrup
¼ tsp salt
1 tsp vanilla extract
Soften gelatin in ¾ cups of water and set aside. In a small saucepan, combine ¾ cups of water with sugar and corn syrup. Bring to a boil and cook to 238˚F on a candy thermometer to make a hot syrup. Using a stand mixer fitted with a whisk, beat the gelatin mixture on high while slowly streaming the hot syrup into the bowl with the gelatin. Then add the salt and extract and beat until stiff peaks form for about 15 minutes.
Using a greased spatula, spread the marshmallow over the cooled brownies. Cool completely, then refrigerate for at least two hours or overnight. Remove using the foil, then, using an oiled knife, cut into 16 pieces.
Optional: Place the cut s’mores on a cookie sheet when ready to serve. Use a kitchen torch or place under the broiler to brown the marshmallow top.
by Kathy Douglas | Aug 20, 2024 | Desserts
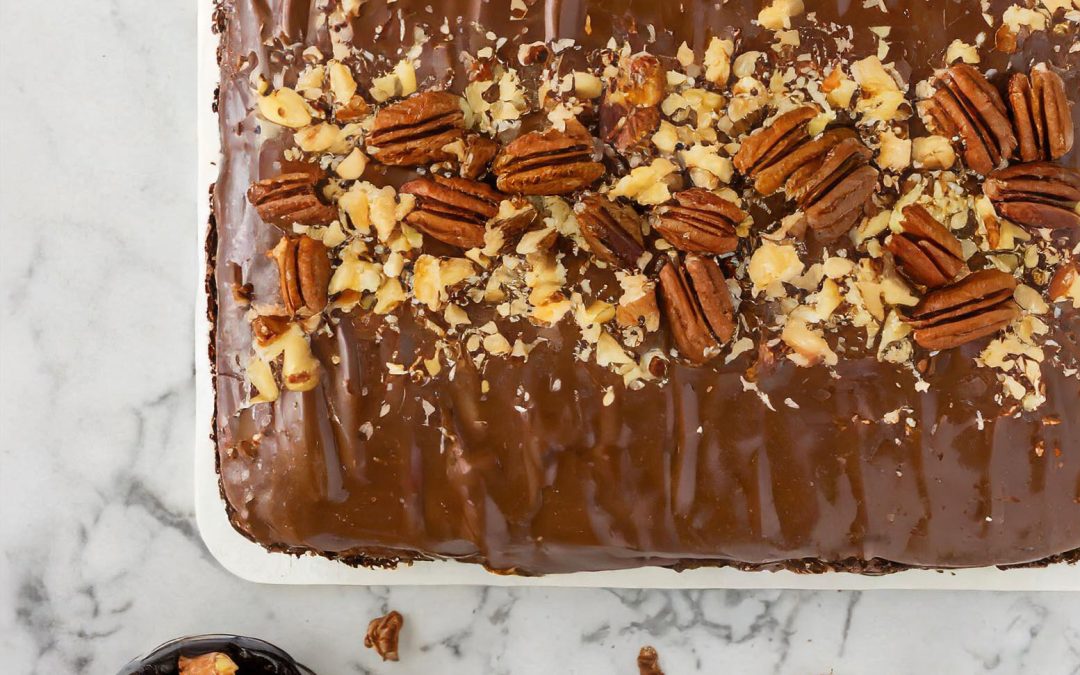
Dive into the rich, indulgent flavors of a classic Texas Sheet Cake, a beloved Southern dessert that never fails to impress. This iconic treat boasts a moist, tender sheet-tray-sized chocolate cake topped with a luscious, fudge-like icing, making it a crowd-pleaser for any occasion.
With its large, easy-to-serve format, Texas Sheet Cake is perfect for Summer or Fall gatherings, potlucks, and celebrations. Using simple ingredients, this one-inch-tall cake has a straightforward preparation that creates a decadent, melt-in-your-mouth experience, ensuring it will quickly become everyone’s favorite. Yields one 13-by-18-inch cake.
Cake
1 cup (227g) unsalted butter, plus more for greasing the pan
2 cups (215g) chopped pecans
2 cups (255g) all-purpose flour
2 cups (400g) granulated sugar
1 tsp baking soda
½ tsp salt
⅓ cup (40g) unsweetened cocoa powder
1 cup warm water
½ cup (115g) sour cream
2 large eggs, beaten
1 tsp pure vanilla extract
Icing
¾ cup (170g) unsalted butter
⅓ cup (40g) unsweetened cocoa powder
¼ cup (60g) whole milk
1 tsp pure vanilla extract
2½ cups (360g) confectioners’ sugar
To prepare the cake:
Preheat the oven to 350˚F. Prepare a 13-by-18-by-1 sheet pan by buttering it well.
Spread the pecans on a second sheet pan. Place in the oven and bake until lightly toasted, 7 to 9 minutes. Set aside to cool.
In a large bowl. combine the flour, sugar, baking soda, and salt; whisk to combine and set aside.
Place a medium saucepan over medium heat to melt the butter, stirring often. Add in the cocoa powder and stir until well combined. Then add the warm water and boil for 30 seconds, stirring continuously. Pour the mixture into the center of the dry ingredients and combine until no traces of flour remain.
Whisk the sour cream, eggs, and vanilla in a medium bowl. Pour into the chocolate mixture and fold gently until incorporated.
Pour into the buttered pan and spread evenly. Bake until a toothpick inserted in the center comes out with only a few crumbs, about 18 to 21 minutes. Remove from the oven and set the sheet pan on a wire rack.
To prepare the icing:
Immediately after the cake comes out of the oven, make the icing. Start by melting the butter in a medium saucepan over medium heat, stirring often. Add the cocoa, stir until smooth and bubbling, then turn off the heat.
Add in the milk, vanilla, and confectioners’ sugar, and whisk until smooth with only very tiny lumps remaining.
Pour the warm frosting directly over the warm cake and spread evenly. Sprinkle the toasted pecans all over the top and gently press into the icing.
Cool completely in the pan on a rack.
Tightly wrapped, the cake will keep at room temperature for up to 3 days.
by Kathy Douglas | Aug 13, 2024 | Entrees
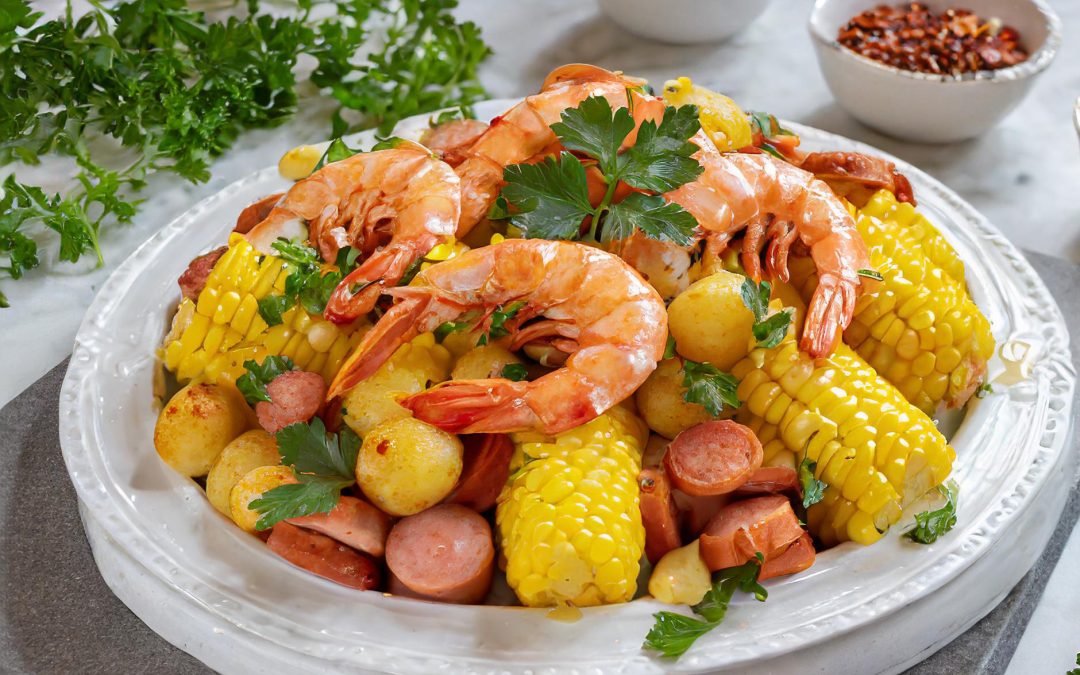
Use an air fryer to elevate your seafood experience with this innovative shrimp boil recipe! Combining the traditional flavors of a classic shrimp boil with the convenience and crispiness of air frying, this recipe is a game-changer. Imagine succulent shrimp, tender potatoes, juicy corn, and savory sausage all perfectly seasoned and cooked to perfection in a fraction of the time. Whether you’re hosting a small casual gathering or craving a taste of the coast, this air fryer shrimp boil is a delightful and easy-to-make dish that brings a modern twist to a beloved favorite. Serves 4.
1 lb fresh large shrimp, shelled and deveined
5 tbsp butter
nonstick cooking spray
8 oz small new potatoes, whole, larger ones cut in half
2 ears of corn, husks and silks removed
2 sweet medium purple onions, sliced into ½ rings
1 tablespoon Old Bay seafood seasoning
One pound andouille sausages, cut into 1/2-inch thick pieces
Chopped parsley leaves
If you have small corncobs, cut in half and large one in three pieces.
Rinse the shrimp and peel and devein them if needed. Preheat your air fryer or set your oven to Air Fry and heat to 370˚F. Coat your air fryer basket with cooking spray.
Melt the butter on the stove in a small saucepan over low heat. Add 1 tablespoon of Old Bay Seafood Seasoning and whisk to combine completely.
In a large bowl, add the small new potatoes, cut corn cobs, and onion slices. Using only half of the seasoned butter, pour over the mixture and toss to coat everything. Add to the air-fry basket and cook for 10 minutes.
After 10 minutes, stir the vegetables and add in the shrimp and the sausages. Cook for 5-8 minutes longer or until the potatoes are fork tender, the shrimp are pink and cooked to 145˚F, and the sausage is cooked to 160˚F.
Pour the contents onto a large platter and pour over the remaining seasoned butter. Sprinkle over parsley leaves and serve immediately.
by Kathy Douglas | Aug 6, 2024 | Desserts
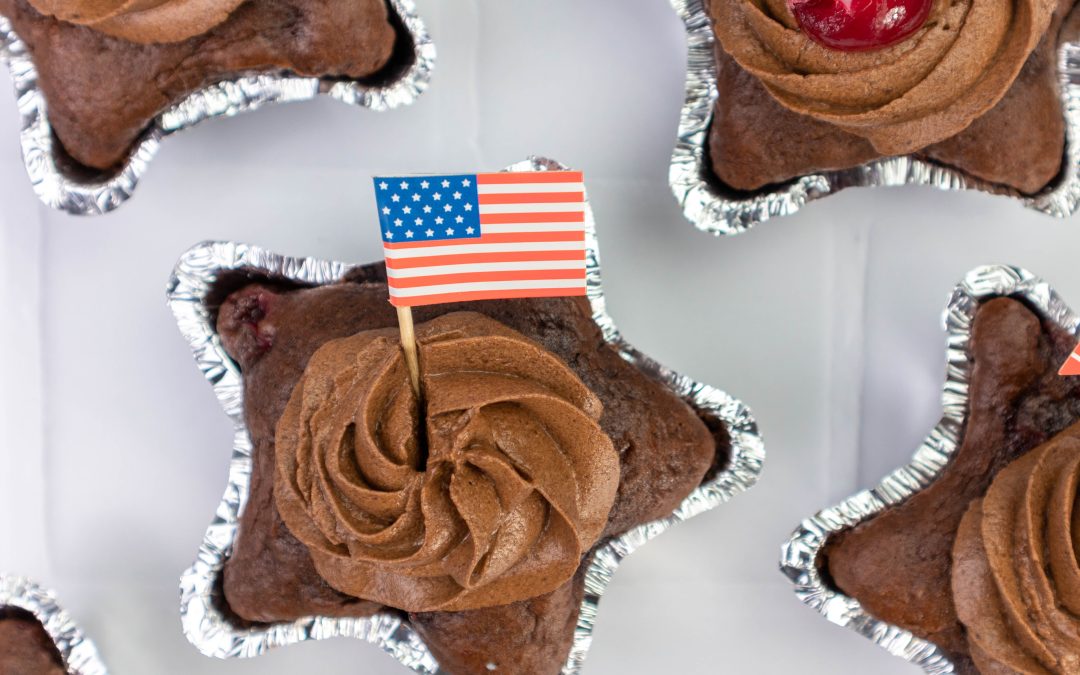
Celebrate the USA with these decadent chocolate cherry cupcakes, a delightful fusion of rich chocolate and sweet cherries. Each moist and fluffy cupcake is studded with juicy cherries, creating a fruity flavor in every bite. To elevate the experience, these delectable treats are topped with smooth and glossy ganache icing, adding a layer of velvety richness. Decorate with tiny flags to match your Olympic theme! Makes 24 cupcakes.
For the cake:
1 3/4 cups all-purpose flour
1 3/4 cups sugar
1/2 cup cocoa powder
1/3 cup instant nonfat dry milk
1 tsp baking powder
1 tsp baking soda
1 tsp salt
1 can cherry pie filling
1 tsp almond extract
3 eggs
cooking spray, as needed
whole cherries and small flags for decoration
For the frosting:
16 ounces bittersweet chocolate, chopped fine
2 cups cream
24 cupcake wrappers
Combine the flour, sugar, cocoa powder, instant nonfat dry milk, baking powder, baking soda, and salt in a large bowl. Whisk to combine completely.
Whisk the three eggs in a small bowl until the yolks and whites are completely mixed.
Make a well in the center of the dry ingredient and add the can of cherry pie filling, eggs, and almond extract. Stir until no dry lumps remain.
Spoon evenly into 24 cupcake pans lightly sprayed with nonstick cooking spray. Bake for 12-15 minutes or until a toothpick in the center comes out clean. Cool before frosting.
Make the frosting while the cake is cooling. Place the chopped chocolate in a bowl. Heat the heavy cream in a quart-sized, microwave-safe container for 3 to 4 minutes on high until just at a simmer. Watch carefully so the cream doesn’t boil. Pour the cream over the chocolate and let stand for 2 minutes. Whisk until the chocolate mixture is smooth.
Put the ganache in the refrigerator for about 30 minutes to get to room temperature, stirring occasionally until it is slightly thick. Once at room temperature, please place it in the bowl of a stand mixer and whisk on high for 2 to 3 minutes until soft and fluffy. Add to a large piping bag fitted with a star tip and pipe on top of the cupcakes or use a knife to spread over the cupcakes.
by Kathy Douglas | Jul 30, 2024 | Desserts
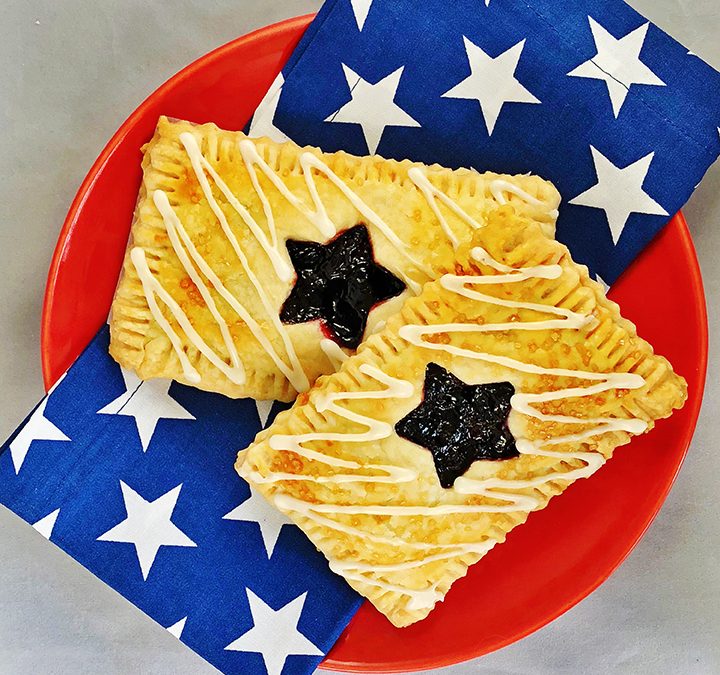
Perfect for your Team USA Olympic watch party, these delightful hand pies require no fork. They feature a scrumptious pie crust filled with blueberries or cherries and topped with white icing for a festive red, white, and blue theme.
Make the Pie Dough
3 cups all-purpose flour
½ teaspoon salt
2 tsp sugar
2 sticks very cold unsalted butter, cut into small cubes
8-10 tablespoons ice cold water
The day before, add the flour, salt, and sugar to the work bowl of a food processor. Pulse to mix thoroughly.
Add the butter and pulse until it becomes the size of peas. With the food processor running, add the water while pulsing until the dough comes together.
Dump out onto a floured surface and, using your hands, gather together to form a large disk. Cut in half and place each half in two floured plastic bags. Form and flatten into a disk in the bag.
Refrigerate over-night.
Make the Filling:
3 cups fresh or frozen cherries or blueberries, stemmed and pitted, fresh cherries cut in half
½ cup sugar
1 tbsp cornstarch
Flour, for rolling the dough
1 egg white
2 tbsp turbinado or raw sugar
1½ cups confectioner’s sugar
2 tsp vanilla extract
The day before, combine the fresh fruit with the sugar and 1 tablespoon of water. Cook over medium heat, occasionally stirring, until the juices are released and the fruit collapses, about 20 minutes. Whisk the cornstarch and 1 tbsp cold water in a small bowl to blend thoroughly. Add the cornstarch mixture, continuing to simmer for 2-3 minutes, stirring often.
Remove from heat and let cool to room temperature. Refrigerate overnight.
Make the Hand Pies:
Line a large-rimmed baking sheet with parchment paper. Working with one disk at a time, roll out the pie dough on a lightly floured surface. Using a sharp knife, dough cutter, or pizza cutter, cut and reroll the scraps of dough for both disks until you have eight 10×3″ rectangles. Whisk the egg white and 1 teaspoon water in another small bowl to make an egg wash.
Working with one 10×3” shape at a time, place on a work surface and brush edges with egg wash. Cut a star shape out of one side. Scoop 2-3 tablespoons of fruit mixture on the other side, then fold the star side of the dough over the filling to form a 5×3″ packet. Crimp all edges with a fork to seal. Place on the prepared baking sheet and repeat with the remaining dough and filling.
Brush tops with egg wash, then sprinkle with the turbinado sugar. Place back in the refrigerator and chill for 30 minutes.
Preheat the oven to 375°. Bake the hand pies until the tops and bottoms are golden brown, about 40 minutes. Let cool for 10 minutes on the baking sheet, then transfer to wire racks to cool completely.
Whisk the confectioner’s sugar with vanilla and 1 tablespoon water. Add more water or sugar to reach the desired consistency for icing. Drizzle over the hand pies and let the icing set for 15-20 minutes before serving. Make 8 hand pies.


Recent Comments